Creating a Headless Raspberry Pi
After attempting to get my brand-new Raspberry Pi up and running, I encountered some issues that others may face along the road. The Raspberry Pi Zero I am using has this Wi-Fi dongle, though I highly recommend this one. The assumption of this article is that you have some experience using macOS Terminal, though minimal knowledge is required.
A good guide for configuring a headless Raspberry Pi Zero is this article written by David Maitland. Unfortunately, his method did not work for me, something I hope to amend through this article. I will be building off much of what David said so that others running macOS may see greater successes.
This was a difficult process for myself because I lacked any of the tools necessary to normally set up a Raspberry Pi. I did not have any displays, cables, keyboard, mice, access to the router – the only items at my disposable were my MacBook Pro and a microSD card reader.
Table of Contents
- This will become a table of contents (this text will be scraped).
Step Zero – Setting up
Firstly, it is advisable that you install Homebrew. Although you are welcome to use any package manager, such as Macports, assistance on my part will be minimal. After installing Homebrew, the only application we need to fetch is nmap which may be installed through the command brew install nmap. We will be using this tool later to locate our Raspberry Pi on the network. Depending on your network settings, that section might be of no use to yourself.
Secondly, if you are running macOS and do not have a Linux VM or partition, then you should download VirtualBox – a free VM engine. After downloading (I won’t provide instructions for this part), you should create a Linux VM (Ubuntu is my choice) as macOS does not support the partition types found on a Raspberry Pi microSD.
Step One – Pick Your Poison
At the moment, the Raspberry Pi Foundation carries two flavors of their distribution – Raspbian Jessie with Pixel, and Raspbian Jessie Lite – both of which I will discuss in this article.
If you are planning on running VNC on your device, I would recommend investing Raspbian Jessie with Pixel. VNC requires that you have an installed windowing system, and most widely available “lightweight” windowing systems create a net storage impact equivalent to Raspbian Jessie with Pixel.
You can find both downloads here as well as installation guides here. Though I will cover installation on a macOS system in this article.
Step Two – Installing the Raspian Image.
Preparing the microSD
- Open Disk Utility and find the microSD card you want to format.
- After selecting the microSD, click Erase in the toolbar, making sure the information is as follow:
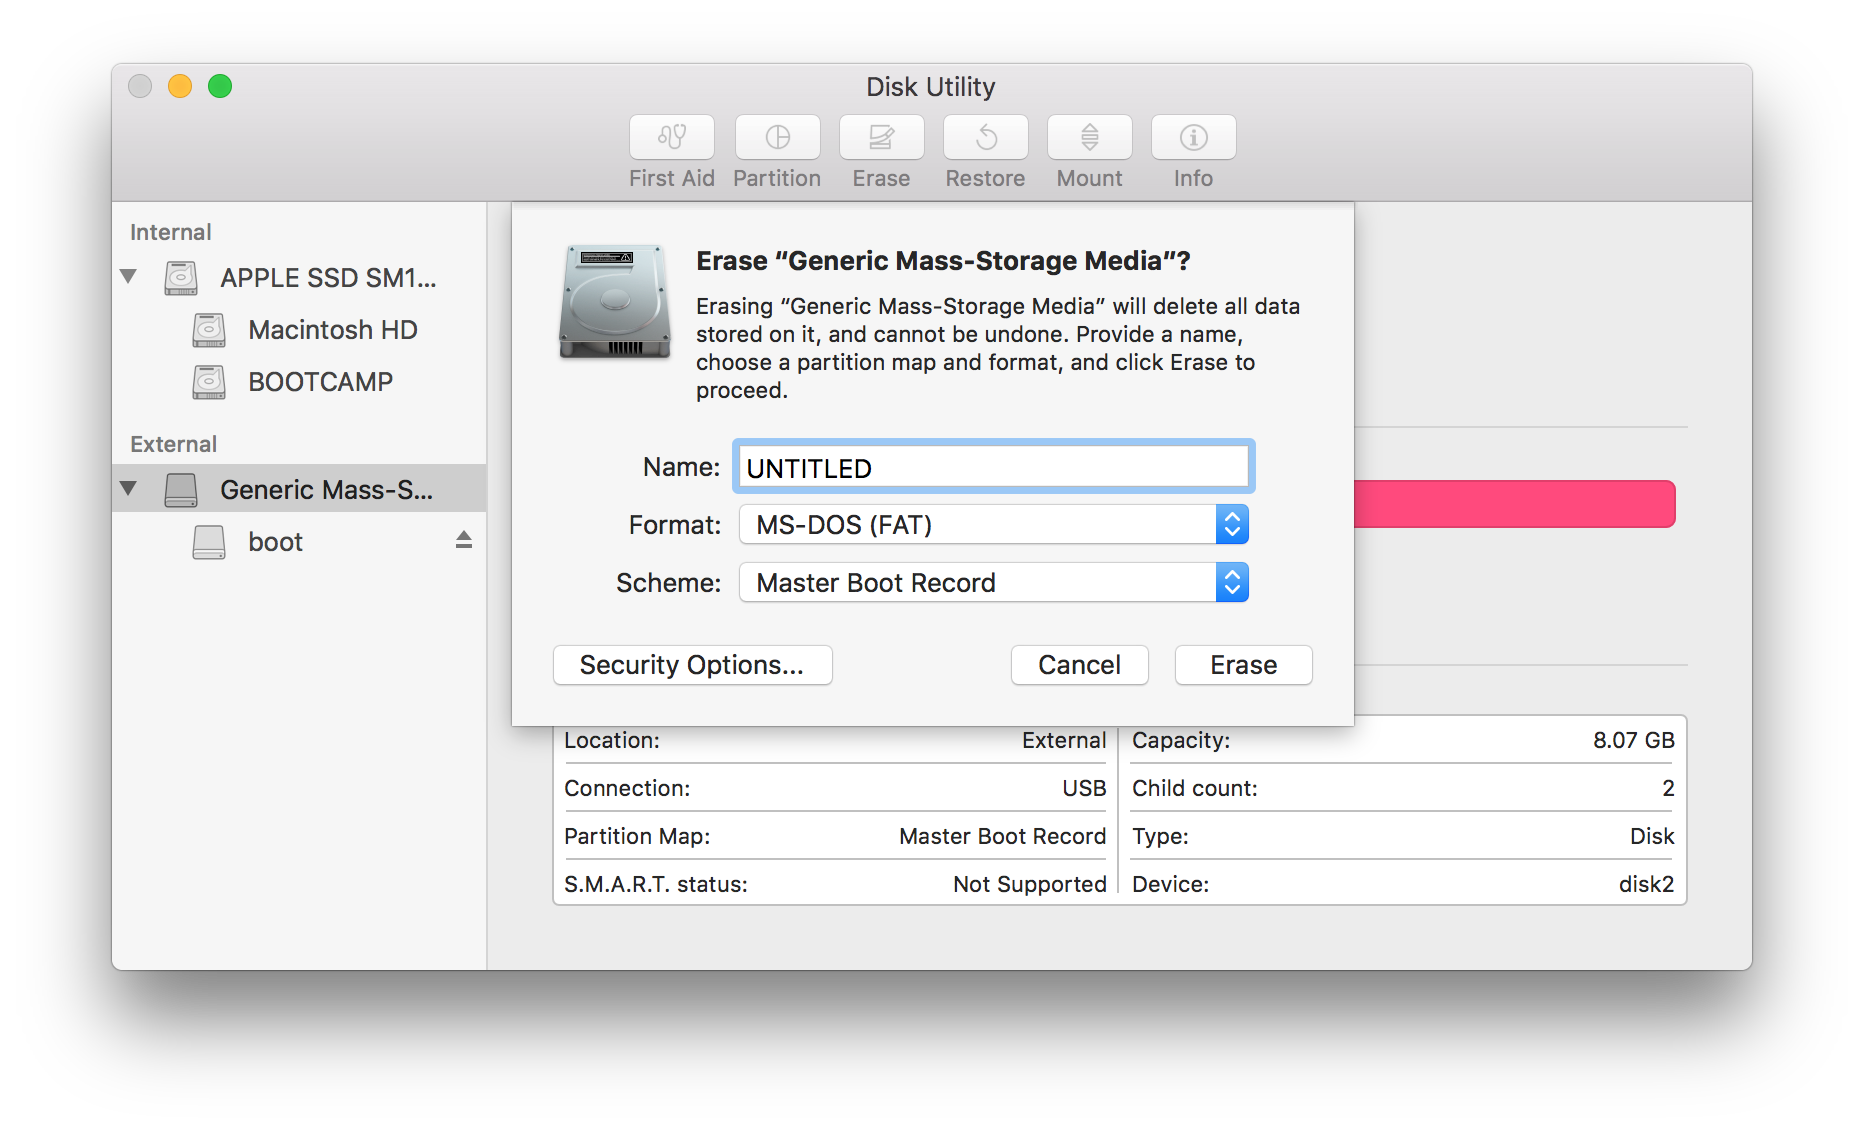 It is important that the drive name is in all capitalized letters, has the format FAT, and the scheme is set to Master Boot Record, otherwise it will not format correctly.
 - Click Erase. Know that depending on the size of the drive and the speed of your microSD and card reader, it may take a couple seconds to a couple minutes. 1
- Make a note of the drive number (found in the Device field in Disk Utility). In the image above, the Device field contains “disk2”.
- Eject but do not remove your device.
Installing Raspbian
- Open up Terminal, remembering where you stored your uncompressed image file (with the extension .img).
- From Terminal run the following command:
sudo dd bs=1m if=/path/to/raspbian.img of=/dev/rdisk2
Replacing /path/to/raspbian with the path to your Raspbian Image, and disk2 with the disk number you collected in Disk Utility – yielding a string similar to rdisk2.
This command may take several minutes depending on the factors outlined in the Preparing the microSD section. 3. After running the command, Raspbian should be installed! You should now eject your microSD through Finder or Disk Utility, though do not remove it.
Step 3 – Accessing Rasbian Filesystem
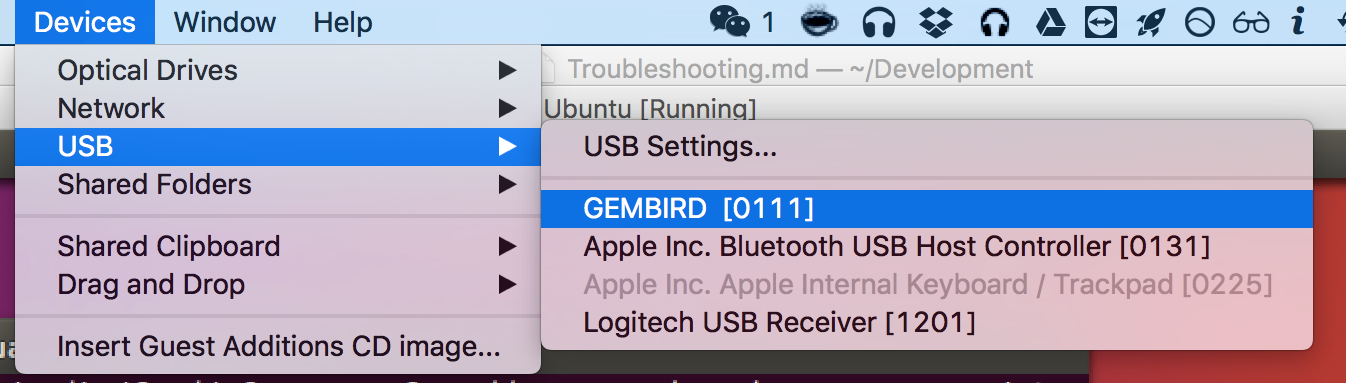
Assuming that your microSD card has been ejected and not removed, in VirtualBox you should be able to see your device under Devices ➔ USB. By clicking it, you should be able to mount it in your VM.2
 Once the microSD card has been mounted we can really get to work.
- Open a command line inside your VM. By running the command
df -h, you should be able to the storage devices attached to your VM and their mount points. Your microSD card should have to entries, which share the same device name e.g.
 /dev/sdb. We want to focus on the partition with the larger mount point address,/media/fred/0aed834e-8c8f-412d-a276-a265dc676112. - Become the superuser by running
sudo su cdto the directory described above i.e.
cd /media/fred/0aed834e-8c8f-412d-a276-a265dc676112
You should now be about to run ls and get approximately the same output as this:
bin   dev home  lost+found  mnt proc  run   srv tmp var
boot  etc lib   media       opt root  sbin  sys usr
Step 4 – Editing Network Settings
This section assumes that you are on a standard, non-enterprise internet connection. If you are, then I would recommend researching elsewhere for setting up your Wi-Fi, e.g. if you have WPA2-Enterprise, this StackExchange question looks good.
Additionally, for this section of the article, I am going to assume that you have basic knowledge of editing files from the command line on Linux. If you do not, then I defer to David Maitland’s guide, as he briefly touches upon editing files in Linux. Though pay attention to what I am adding to files, as David’s guide – as nice as it is – did not work with my setup. Additionally, as David also points out in the guide, pay attention to the file paths I am editing, as we are not trying to modify our own system files, rather the files that on the microSD card.
Setting Up the Network Interfaces
- Open up the file
etc/network/interfacesfor editing. I prefer thenanoeditor, so I will runnano etc/network/interfaces. - Find the part of the file containing the text:
allow-hotplug wlan0
iface wlan0 inet manual
    wpa-conf /etc/wpa_supplicant/wpa_supplicant.conf
If you want to use DHCP to allocate yourself an IP address, replace the above block of text with:
auto wlan0
allow-hotplug wlan0
iface wlan0 inet dhcp
    wpa-conf /etc/wpa_supplicant/wpa_supplicant.conf
Otherwise, if you want to use a static IP address, replace the above block of text with:
auto wlan0
allow-hotplug wlan0
iface wlan0 inet static
    address 192.168.1.20 # IP for your Raspberry Pi
    netmask 255.255.255.0
    gateway 192.168.1.1 # IP for your router
    wpa-conf /etc/wpa_supplicant/wpa_supplicant.conf
Note: If you’re Raspberry Pi does not have an onboard Wifi module and your interfaces file contains references to wlan1, remove all lines containing said references.
Setting up WPA Credentials
- Open the file
etc/wpa_supplicant/wpa_supplicant.conffor editing. - Under the line
update_config=1, we will place our configuration. Unless you are not using WPA2, it should be relatively simple. You can add the following lines, replacewith the name of your network, and with the password to your network, in plain text.
network={
  ssid="<netname>"
  psk="<pass>"
}
Your Raspberry Pi should now be configured to connect to your network. Unfortunately, we do not yet have a way of communicating with it. This is where setting up ssh comes into play.
Step 5 – Configuring the SSH Server
Both Raspbian Jessie and Jessie Lite come preinstalled with an SSH server. Unfortunately this is not a service that starts by default, and instead must be initially configured to start on boot.
- Open the file
etc/rc.localfor editing. - Before the line consisting of
exit 0, add the line
/etc/init.d/ssh start
This should ensure that the SSH server launches on boot. After the completion of this step, you are free to eject and remove the microSD card from your computer and shut down your virtual machine. The rest of this tutorial will take place in the macOS. If you plug in your Raspberry Pi and wait a minute, you should be able to SSH into it! If you only had the IP address…
Step 6 – Finding our Lost Device
Note: This step may not be necessary depending on your intranet connection. You might be able to just SSH into your Raspberry Pi by running ssh pi@raspberrypi or ssh pi@raspberrypi.local. Alternately, if you have access to the administration panel of your router, typically you can figure out on which IP your Raspberry Pi sits.
For this step, we will use the command nmap to discover which devices on the network have port 22 open. We will conduct a simple process of eliminations. In the upcoming commands, I am assuming that your network runs on the 192.168.X.X space. If your network runs on the 10.0.X.X space, then simply replace 192.168.0.0 with 10.0.0.0. Not sure? Check what your IP address is.
- Before plugging in your Raspberry Pi to a power source run
sudo nmap -p22 -sV 192.168.0.0/24to see which devices on the network have the port 22 (ssh) open. - Subsequently, plug the Raspberry Pi in again and run
sudo nmap -p22 -sV 192.168.0.0/24. The set of devices from the first test minus the set of devices from the second test should yield the IP address for the Raspberry Pi. For me, using the HomeSpot WiFi USB, my device appeared as follows:3
Step 7 – Enabling SSH
Through the tool raspi-config, Raspbian has native functionality that allows for the SSH daemon to be started at system boot. This functionality was previously locked to us because we had not had a shell into the Raspberry Pi, however now that we do, we can enable it.
- Start an ssh session with your Raspberry Pi.
- Enter the command
sudo raspi-config. After the full-screen menu appears, select Advanced Options, using the arrow keys to navigate, and TAB to select “Select” and “Finish”. You should be prompted with: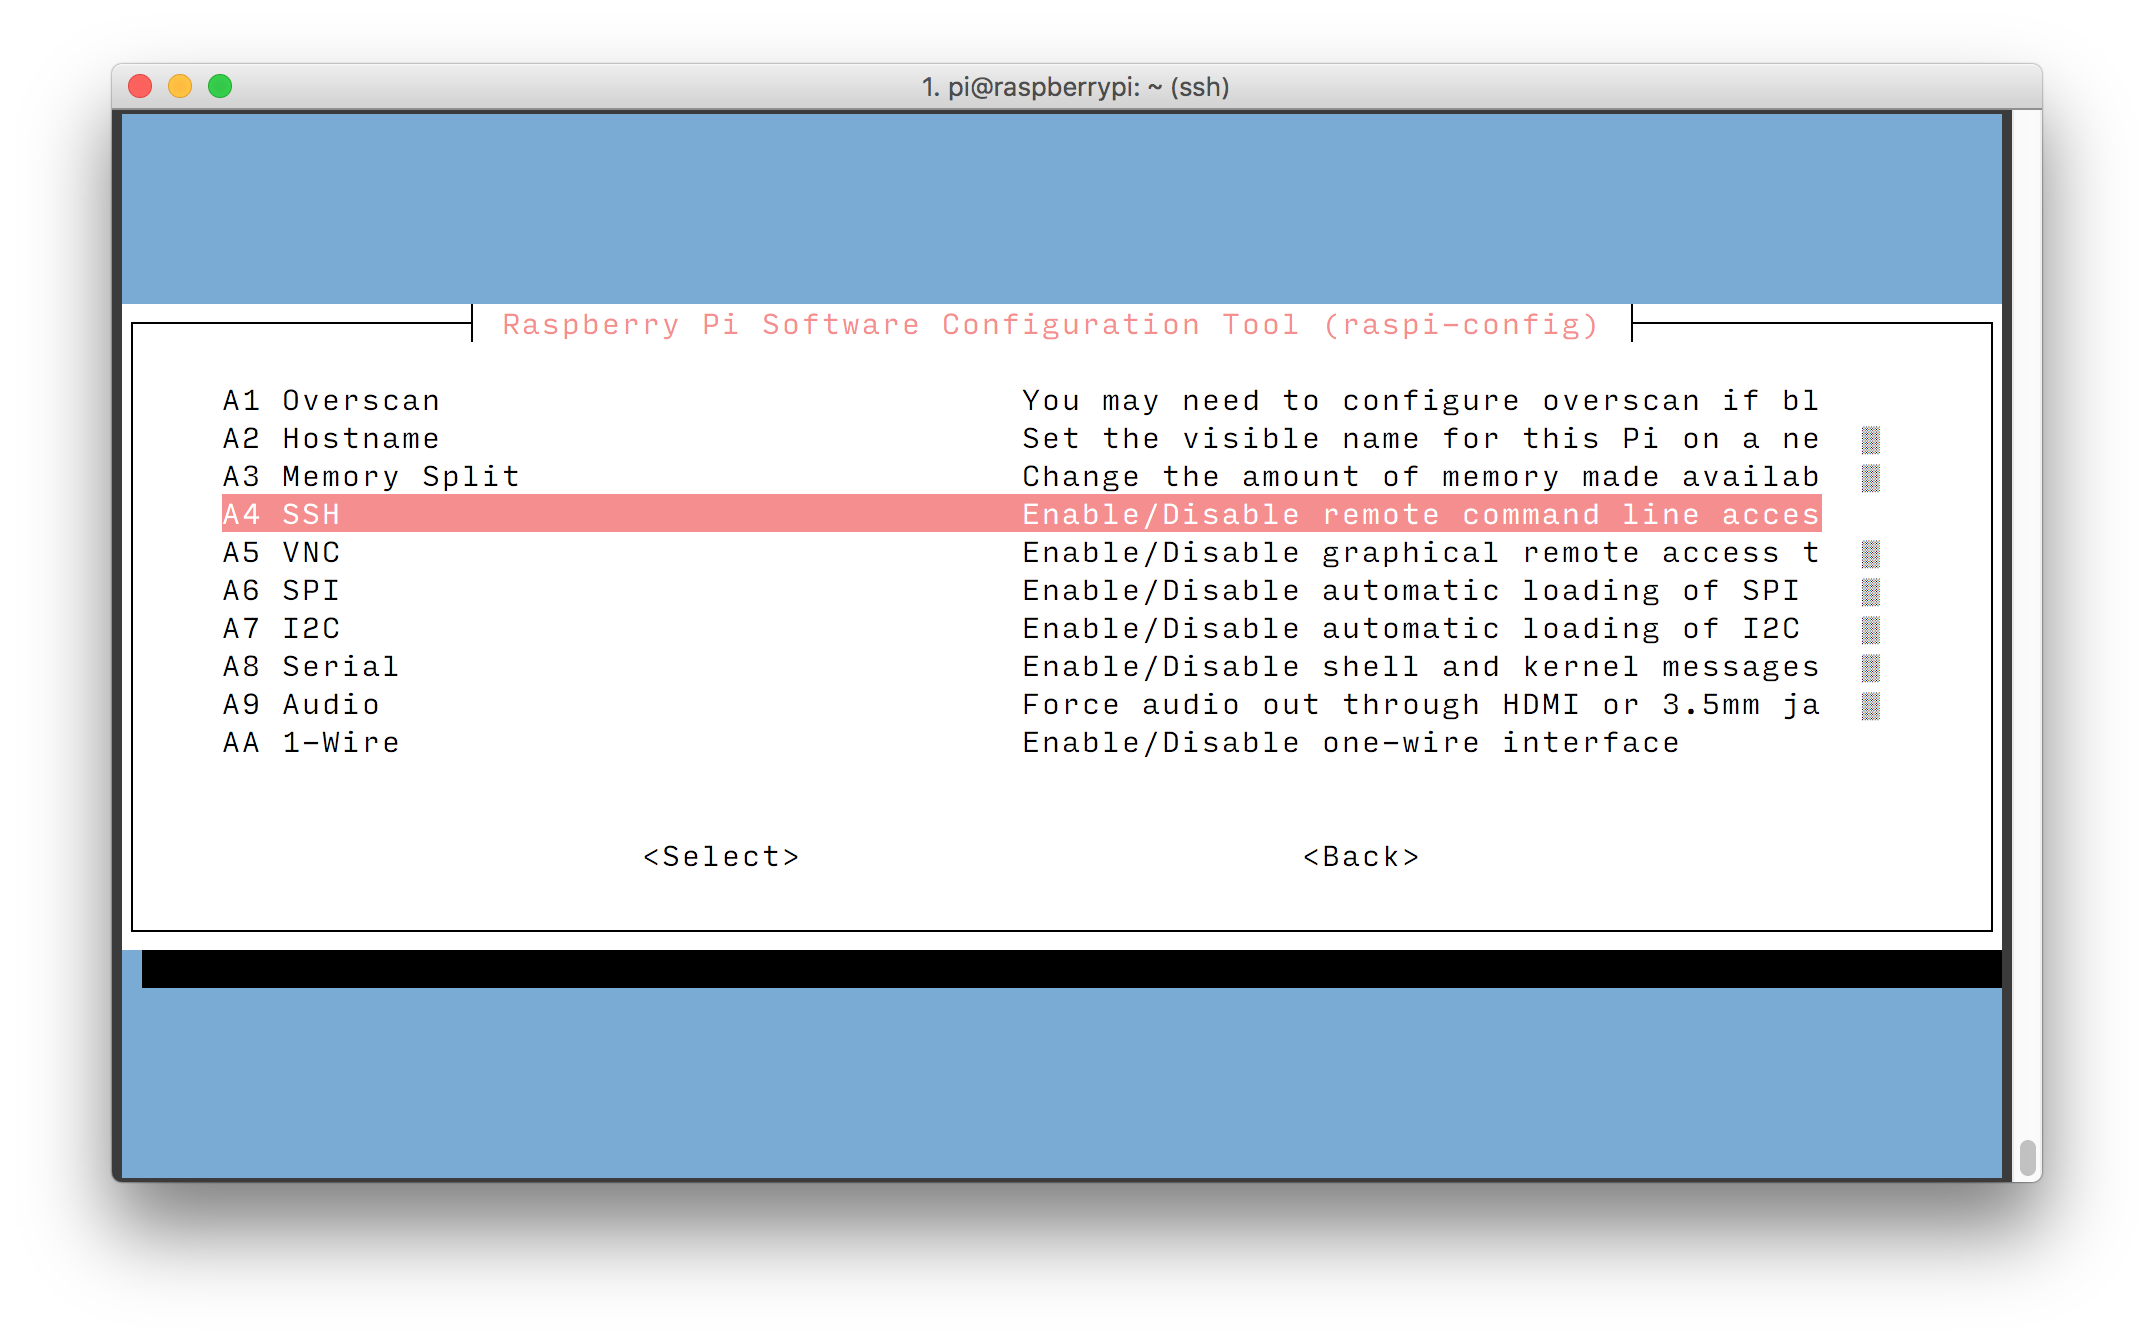 By selecting SSH you should be prompted with the option to enable/disable it – you want to enable it.
 - Now we have to undo the changes we made to rc.local. Using
nanoor any other of your favorite command-line editors, open/etc/rc.locali.e.
sudo nano /etc/rc.local
- Delete the line we created (
/etc/init.d/ssh start) from/etc/rc.local, then save and exit.
(Optional) Step 8 – Enabling VNC
Note for Raspbian Jessie Lite
This is not recommended for people who want to “remain” using Jessie Lite. In order to run a VNC server, you must install a windowing system which is the bulk difference between Raspbian Jessie and Jessie Lite. If you want to continue, please do, but this will likely take up to 500MB of additional storage. My preferred GUI for the Raspberry Pi is PIXEL, as it is the official windowing system of the Raspberry Pi Foundation. That being said any windowing system should work. A good guide for installing lightweight windowing system can be found here, though I will walk you through installing PIXEL.
- To install PIXEL and the default VNC server, run the command:
sudo apt-get install raspberrypi-ui-mods tightvncserver
- You may now continue with the General Case instructions.
General Case
In a similar method to enabling SSH, enabling VNC is simple on Jessie. If you want to have a temporary VNC server run, you may run the command vncserver :port, where “port” is the port you want it to be on (default port 5900 and 5800). Temporary server users may skip this step entirely.
- From the command-line or SSH, run the command
sudo raspi-config. - Again, enter Advanced options and select VNC, selecting the option to enable the service. Now you should see upon reboot, the VNC server starts using the default ports.
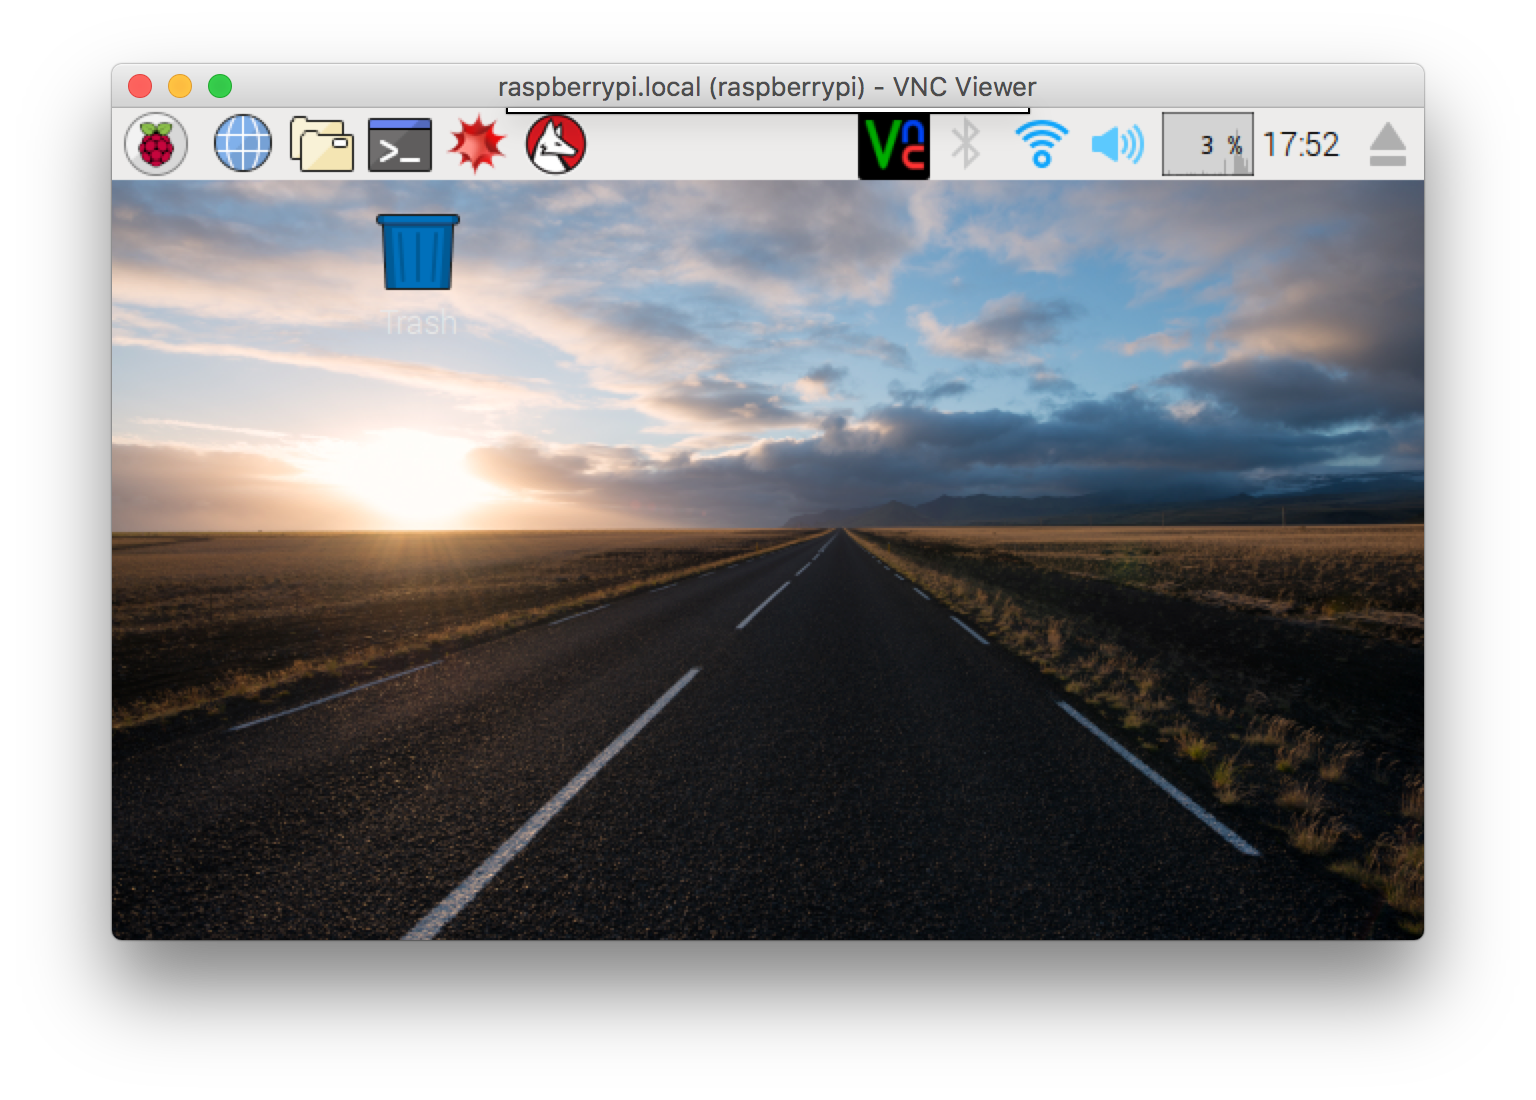
- You can connect to your device by using VNC® Viewer from RealVNC®, and entering the IP address when connecting.
Troubleshooting
1 If erasing failed, check that the new device name is in all capital letters. Also check that the type is set 2 If the device appears grayed out, that means it is still in use by your system. You need to eject (but not remove) the microSD card before it can be mounted in your VM. 3 If you do not see your device listed in nmap, that likely means that it is unable to connect to the Internet. If so, first check that it is nearby a router. Otherwise, you need to plug your microSD back into your VM and check that you modified the files correctly.